Private Label Eyewear Packaging: How to Design Cases, Boxes, and Inserts That Sell
Your frames are ready. Your logo is confirmed. Then someone asks: what does the packaging look like?
Private label eyewear packaging is not a finishing touch — it’s a brand decision. The case, the box, the cleaning cloth, the hang tag — every component shapes how your customer perceives the product before they ever put it on their face. Get it right and your packaging reinforces the price you’re charging. Get it wrong and it undercuts everything the frame communicates.
We’ve helped brands across fashion, retail, and lifestyle categories develop eyewear packaging from first brief to production. Here’s how to approach it as a strategic decision — not an afterthought.
Why Packaging Is a Brand Decision, Not a Production Detail
Most brands treat packaging as the last item on the checklist. It shouldn’t be.
Packaging is the first physical thing your customer touches. Before they experience the frame, the lens quality, or the fit — they experience the box, the case, the feel of the cloth in their hand. That experience sets their expectation for everything that follows. A premium frame in generic packaging loses perceived value immediately. A mid-range frame in considered packaging feels worth more than its price.
This matters even more in two specific contexts: e-commerce, where the unboxing moment replaces the retail shelf experience entirely; and wholesale B2B, where the packaging your retailer receives communicates your brand’s professionalism before a single unit reaches an end consumer.
The good news is that packaging decisions are more manageable than most brands expect — once you understand what’s available, what it costs, and how to match it to your brand positioning.
The Core Components of Private Label Eyewear Packaging
Before you can design a packaging system, you need to know what you’re designing.
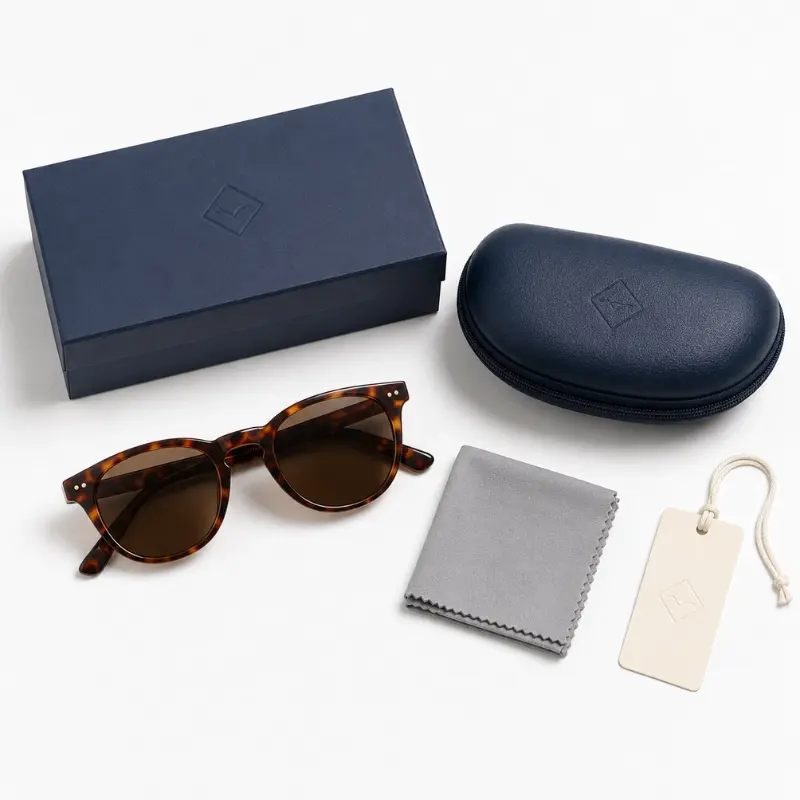
Private label eyewear packaging typically consists of five components — each with its own design options, material choices, MOQ requirements, and cost range. Understanding what each component does and where it sits in the brand experience is the starting point for any packaging brief.
Eyewear Case
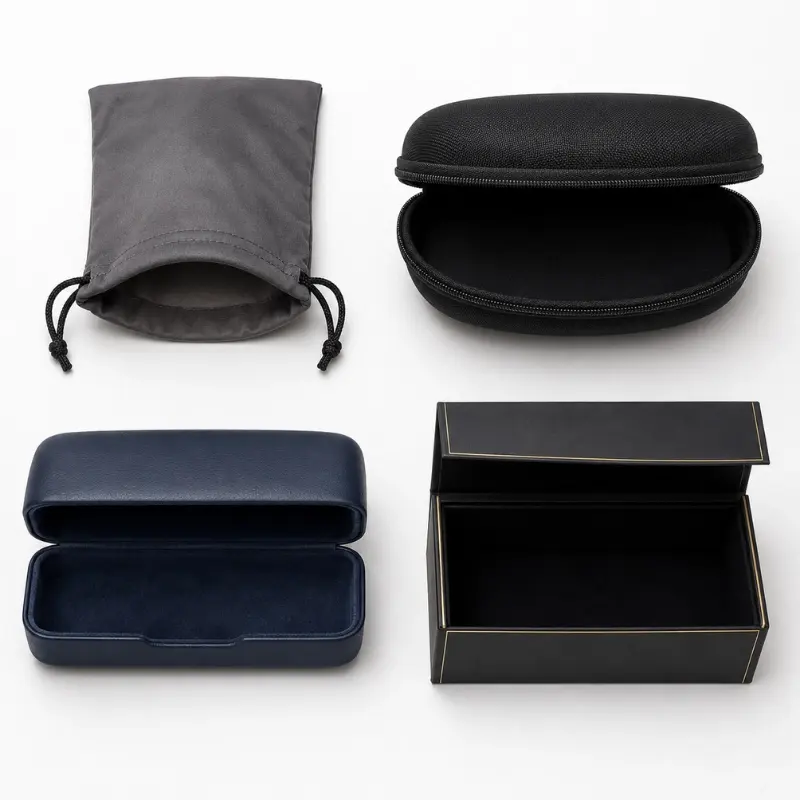
The case is the primary packaging component — it protects the frame during shipping and daily use, and it’s what your customer keeps long after the retail box is discarded. Case options range from soft pouches to rigid clamshell cases to premium hinged boxes.
Soft pouch: Velvet or microfiber drawstring or zip-closure pouches. Lightweight, low cost, low MOQ. Works for entry-level and mid-range brands, and for brands where the minimal aesthetic is intentional. Does not provide strong frame protection — not ideal for shipping without additional outer packaging.
Semi-rigid case: The most common eyewear case format. An EVA or ABS outer shell with a soft interior lining, typically in clamshell or barrel-roll closure. Good frame protection, brandable surface (logo embossed, printed, or foil-stamped), manageable cost. Works across all price points from mid-range upward.
Full rigid case: A hard-shell case in PU leather, genuine leather, aluminum, or custom-molded materials. Higher cost, heavier, stronger brand signal. Standard for premium and luxury eyewear positioning. The case itself becomes part of the product’s perceived value.
Magnetic closure box-case: A hinged rigid box with magnetic closure and interior foam or fabric insert. Common in premium and luxury gift sets. Strong unboxing experience. Higher cost and longer lead time than standard cases.
Retail Outer Box
The retail box is the display and point-of-sale packaging — what sits on the shelf or ships in the branded outer box for e-commerce. It contains the case and any inserts.
Options include standard tuck-end boxes, rigid sleeve boxes, magnetic closure rigid boxes, and drawer-style slide boxes. Material choices range from standard coated cardboard to textured or embossed rigid board. Finishing options — foil stamping, UV spot varnish, soft-touch lamination, embossing — determine the perceived quality tier.
Microfiber Cleaning Cloth
A branded microfiber cleaning cloth is the most cost-effective brand touchpoint in the entire packaging system. It’s used regularly, kept long-term, and carries your brand logo every time your customer cleans their lenses. Single-color or full-color logo print. Custom size, thickness, and color available.
Lens Cleaning Wipe or Spray (Optional)
Higher-end functional eyewear brands sometimes include a single-use cleaning wipe or a small branded cleaning spray. Adds perceived value and functional utility, particularly for blue light glasses or prescription-ready frames.
Hang Tag and Lens Sticker
The hang tag carries product information — frame name, material, lens type, size, and care instructions. The lens sticker identifies lens specifications and compliance information (UV400, polarized, CE). Both are printed components with low MOQ and low per-unit cost — often overlooked but important for retail presentation and compliance.
Inner Carton and Export Packaging
For B2B orders, the inner carton and export master carton are functional packaging — protecting your product during freight. Well-designed inner cartons also signal professionalism to the retailer unpacking the shipment. SKU labeling, barcode stickers, and individual frame wrapping all belong in this layer.
Packaging by Brand Positioning: A Decision Framework
The most useful question in eyewear packaging design is not “what looks good?” — it’s “what fits where my brand is positioned?”
Packaging should match the price your customer is paying and the experience they expect at that price. Over-investing in packaging at an entry price point erodes your margin without meaningfully improving the customer experience. Under-investing at a premium price point signals that the product isn’t worth what you’re charging.
Here is a practical packaging framework by brand positioning tier:
| Brand Tier | Retail Price | Case | Retail Box | Cloth | Hang Tag | Approx. Packaging Cost/Unit |
|---|---|---|---|---|---|---|
| Entry | $20–$50 | Microfiber pouch | Simple tuck-end box, 1–2 color print | Standard branded cloth | Basic card hang tag | $0.80–$2.00 |
| Mid-range | $50–$100 | Semi-rigid clamshell EVA case | Sleeve box or simple rigid box, full-color print | Branded microfiber cloth, custom color | Printed hang tag with brand story | $2.00–$5.00 |
| Premium | $100–$200 | Full rigid PU leather case | Rigid magnetic closure box, foil stamp + soft-touch finish | Thick custom microfiber cloth | Premium card hang tag, embossed or foil | $5.00–$12.00 |
| Luxury | $200+ | Custom-molded or genuine leather case | Drawer box or lidded rigid box with interior tray | Branded silk or premium microfiber | Numbered or art-printed hang tag, ribbon closure | $12.00–$30.00+ |
Here’s the deal: the packaging cost per unit at the premium tier ($5–$12) sounds high in isolation — but against a $150 retail frame, it represents 3–8% of retail price. That’s a standard packaging investment ratio for any premium product category. At entry level, keeping packaging cost under $2 per unit is achievable without sacrificing brand consistency.
The goal is alignment, not spending. A well-chosen $2 pouch with clean branding tells a more coherent brand story than a $6 rigid case that doesn’t match the frame’s aesthetic.
Packaging for Online vs. Retail: Two Different Jobs
The same product often needs different packaging depending on where it’s sold — and this is one of the most commonly overlooked decisions in eyewear packaging design.
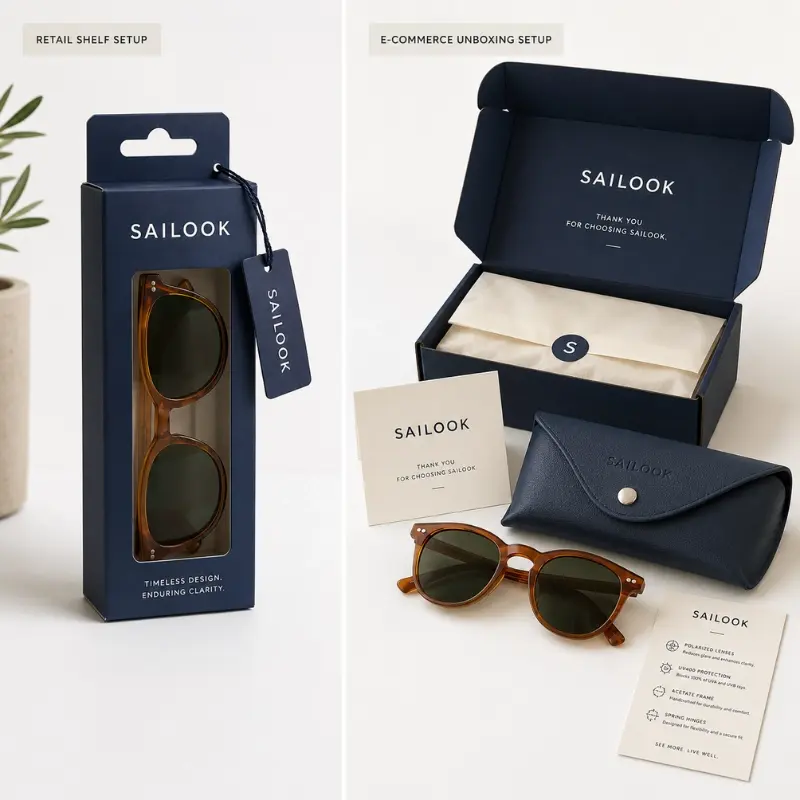
Retail packaging and e-commerce packaging have different primary jobs. Retail packaging sells from the shelf — it needs to be visually striking at a distance, display product information clearly, and hold up to handling. E-commerce packaging sells through the unboxing — it needs to survive shipping intact, create a memorable opening experience, and communicate brand values to a customer who had no in-store touchpoint.
Retail packaging priorities
- Shelf visibility: The outer box needs to be legible and visually distinctive from 1–2 meters away. Bold logo, clear product photography or illustration, high-contrast color palette.
- Product visibility: Many retail eyewear boxes include a window cut or open-face display that lets the customer see the frame before purchase. Die-cut windows increase production cost but reduce purchase hesitation.
- Retailer handling: Packaging must withstand being handled, opened, resealed, and restocked. Magnetic closures, tab closures, and rigid formats hold up better than soft-tuck boxes in retail environments.
- Display compatibility: If your product will be displayed on a hook, ensure your box has a Euro hole. If shelf-standing, confirm your box has a stable base and a readable front panel at shelf height.
E-commerce packaging priorities
- Shipping protection: The frame must arrive undamaged through the entire logistics chain — from your warehouse to a courier to the customer’s door. This means your inner case must actually protect the frame (soft pouches alone are not sufficient for courier shipping), and your outer mailer or shipper box must add a protective layer.
- Unboxing experience: For direct-to-consumer e-commerce brands, the unboxing IS the retail moment. Tissue paper, branded tape, a handwritten-style thank-you card, the reveal of the case inside the box — these create the emotional beat that drives social sharing and repeat purchase.
- Functional information: Your customer has no sales associate to explain the product. Your packaging must communicate lens type, UV protection level, frame material, and care instructions clearly. A folded product card inside the box is standard practice for e-commerce eyewear.
- Returns consideration: E-commerce has higher return rates than retail. Packaging that can be resealed and reused for returns reduces damage and simplifies the returns process for both brand and customer.
If you’re selling both channels
Design your packaging system with retail as the base and e-commerce as the layered experience. Use a retail-ready box that works on shelf, then add e-commerce-specific elements (tissue, thank-you card, product insert card) in the outer shipper for direct-to-consumer orders. This lets you run a single packaging SKU for the core components while differentiating the channel experience through low-cost add-ins.
How to Design Your Eyewear Packaging: A Brief-to-Production Process
Good packaging doesn’t happen by accident. It follows a process — and the most common mistakes happen when brands skip steps.
The packaging development process mirrors the frame development process: brief, design proposal, sample, revision, approval, production. The difference is that packaging has more components, more suppliers, and more artwork files — which means more places for things to go wrong if the brief isn’t clear from the start.
Step 1: Define your packaging brief
Before any design work begins, define:
- Brand direction: Color palette, logo files (vector AI or EPS), aesthetic references
- Channel: Retail, e-commerce, or both
- Brand positioning tier: Entry, mid-range, premium, or luxury — this determines your material and finish options
- Component list: Which components you need (case, box, cloth, hang tag, lens sticker, insert card)
- Target cost per unit: What your packaging budget allows at your production volume
- Timeline: Your target delivery date, working backwards from production and lead times
Step 2: Review design proposals and confirm materials
Your manufacturing partner will provide a design proposal — typically a visual mockup showing the case shape, box structure, logo placement, and color direction. At this stage, confirm:
- Does the case shape fit your frame dimensions? (Oversized cases look cheap; undersized cases stress the frame)
- Is the material consistent with your positioning tier?
- Are the logo placement and method consistent with how your logo appears on the frame?
Step 3: Request physical samples before bulk approval
Packaging samples are as important as frame samples. A box that looks good on screen may feel flimsy in hand, have a lid that doesn’t close cleanly, or print your logo in a color that doesn’t match your Pantone specification.
Request physical samples of every component before approving bulk production. Check:
- Case closure mechanism (hinge, magnet, snap — is it smooth and secure?)
- Material texture and weight (does it feel consistent with your price point?)
- Logo print accuracy (color, position, depth — compare to your Pantone spec)
- Box structure (does it hold its shape? does the lid align correctly?)
- Cloth feel and print quality (is the microfiber thick enough? is the logo crisp?)
Step 4: Confirm artwork files for production
Each packaging component needs its own production-ready artwork file. This is where many brands lose time — submitting files that aren’t production-ready causes delays and additional rounds of artwork revision.
Packaging Artwork File Requirements
This is the step most brands underestimate — and where the most production delays happen.
Every packaging component requires a separate, production-ready dieline or artwork file. Files that work for screen or print design don’t automatically work for packaging production. Submitting incorrect files causes revision rounds, delays, and in some cases, wasted sample production.
Required file format
All artwork files must be provided in vector format — AI (Adobe Illustrator) or EPS. The dieline (structural cutting and folding guide) must be on a separate layer from the print design. Never provide raster files (JPEG, PNG) as the primary production file.
Dieline accuracy
The dieline defines exactly where the box folds, cuts, and glues. If your dieline dimensions are wrong — even by 1–2mm — the box won’t close correctly or won’t fit the product. Always request the manufacturer’s confirmed dieline template before designing your artwork. Design to their template, not to your own measurements.
Color specification
Specify all colors using Pantone Matching System (PMS) codes — not RGB or screen-based colors. What looks gold on your monitor may print as yellow without a proper PMS reference. For metallic effects (gold or silver foil stamping), confirm the specific foil reference code with your packaging supplier.
Bleed and safe zone
All print files must include:
- Bleed: Minimum 3mm bleed on all edges that will be cut
- Safe zone: Keep all text and logos at least 3mm inside the cut line
- Resolution: Any embedded raster elements (background textures, photography) must be minimum 300dpi at final print size
Separate files per component
Provide a separate, clearly labeled artwork file for each component:
- Outer retail box (dieline + print)
- Case surface (if printed or embossed)
- Microfiber cloth (print area template)
- Hang tag (front and back)
- Lens sticker
- Insert card (if applicable)
One consolidated PDF for “review” is not a substitute for individual production files.
Packaging MOQ and First-Order Planning
Packaging MOQ is the most commonly miscalculated part of a first private label eyewear order — and it’s the one that most often causes budget surprises.
Packaging components have their own MOQ requirements, independent of frame MOQ. A frame order of 300 units does not automatically mean you can order 300 custom retail boxes. Packaging suppliers typically require 500 to 1,000 units minimum for custom-printed components — and each component has its own minimum. Plan your packaging quantities before you confirm your frame order.
Here’s a practical MOQ reference for common eyewear packaging components:
| Component | Typical MOQ | Lead Time | Cost Range per Unit |
|---|---|---|---|
| Microfiber pouch | 300–500 pcs | 10–15 days | $0.30–$0.80 |
| Semi-rigid EVA case | 300–500 pcs | 15–20 days | $0.80–$2.00 |
| Full rigid PU case | 300–500 pcs | 20–30 days | $2.00–$5.00 |
| Standard retail box (tuck-end) | 500–1,000 pcs | 15–20 days | $0.50–$1.50 |
| Rigid sleeve box | 500–1,000 pcs | 20–25 days | $1.50–$3.50 |
| Magnetic closure rigid box | 500–1,000 pcs | 25–35 days | $3.00–$8.00 |
| Microfiber cleaning cloth | 500–1,000 pcs | 10–15 days | $0.20–$0.60 |
| Hang tag (printed) | 500–1,000 pcs | 7–10 days | $0.05–$0.20 |
| Lens sticker | 1,000+ pcs | 5–7 days | $0.02–$0.05 |
How to align packaging MOQ with frame MOQ on your first order
The most common first-order mistake is confirming a 300-unit frame order and then discovering that your custom retail box requires 500 units minimum. You’re left with two options: order 200 extra frames you didn’t plan for, or over-stock 200 boxes that don’t have frames to go in them.
Here’s how to avoid this:
Option 1: Match your packaging MOQ to your frame quantity Use packaging components that start at 300 units — semi-rigid cases, microfiber pouches, and basic hang tags all typically start at this level. Avoid premium rigid boxes and magnetic closure boxes on your first order, as these tend to have 500–1,000 unit minimums.
Option 2: Order up to the packaging MOQ If your chosen packaging requires 500 units minimum, plan your frame order at 500 units. The additional inventory is your buffer stock for reorders — you’ll use it.
Option 3: Start with semi-custom packaging Use a standard case in your brand color with logo embossing, add a branded cleaning cloth and a printed hang tag. This approach keeps every component at the same 300–500 unit range. Upgrade to fully custom packaging on your second order once you’ve validated which styles sell.
Here’s what most people miss: packaging lead time is often longer than frame lead time for certain components. A magnetic closure rigid box with custom finishing takes 25–35 days to produce — potentially longer than your frame production. Brief your packaging supplier at the same time as your frame manufacturer, not after frame approval.
This is part of our complete guide to private label eyewear manufacturing. If you want to discuss your packaging direction alongside your frame brief — we develop both together and can help you align MOQs, lead times, and brand consistency from the start. We respond within 4 business hours.
Conclusion
Private label eyewear packaging is a brand decision dressed up as a production detail. Choose packaging that matches your positioning, serves your channel, and aligns with your frame MOQ. Brief your packaging supplier early — at the same time as your frame manufacturer, not after. Prepare production-ready artwork files before sampling begins. And on your first order, keep it simple: one well-chosen case, a branded cloth, and a clean hang tag communicate more brand coherence than six mismatched premium components that over-ran your budget.
Frequently Asked Questions
What packaging does private label eyewear typically include? A standard private label eyewear packaging set includes an eyewear case (soft pouch, semi-rigid EVA case, or full rigid case depending on positioning), a branded microfiber cleaning cloth, a hang tag with product information, and optionally a retail outer box and lens sticker. Each component has its own MOQ and lead time.
How much does custom eyewear packaging cost per unit? Packaging cost per unit ranges from under $1 for entry-level (microfiber pouch, basic hang tag) to $5–$12 for premium (full rigid PU case, magnetic closure retail box, thick microfiber cloth) to $12–$30+ for luxury custom-molded or genuine leather packaging. The right investment is approximately 3–8% of your retail price point.
What is the MOQ for custom eyewear packaging? MOQ varies by component. Semi-rigid cases and microfiber pouches typically start at 300–500 units. Retail boxes — especially rigid or magnetic closure styles — typically require 500–1,000 units minimum. Cleaning cloths and hang tags often start at 500 units. Each component has its own separate minimum — plan all packaging quantities before confirming your frame order.
What file format do I need for eyewear packaging artwork? All packaging artwork must be supplied as vector files — AI (Adobe Illustrator) or EPS format. Always design to the manufacturer’s confirmed dieline template. Specify all colors in Pantone Matching System (PMS) codes. Include minimum 3mm bleed on all cut edges and keep logos and text at least 3mm inside the safe zone.
Should eyewear packaging be different for online vs. retail? Yes. Retail packaging needs to sell from the shelf — visible at distance, clear product information, resistant to handling. E-commerce packaging needs to survive shipping and create an unboxing experience — with added protection, product information inserts, and brand touchpoints like tissue paper or a thank-you card. If selling both channels, design a retail-ready base and layer in e-commerce-specific elements for direct-to-consumer orders.
How do I match my packaging to my brand positioning? Entry brands ($20–$50 retail) should use microfiber pouches or simple semi-rigid cases with basic printing — keep packaging cost under $2/unit. Mid-range brands ($50–$100) should use semi-rigid cases with clean full-color branding — $2–$5/unit. Premium brands ($100–$200) should use full rigid cases and magnetic closure boxes with premium finishes — $5–$12/unit. Luxury brands ($200+) should use custom or genuine leather cases with bespoke inserts — $12–$30+/unit.
Can I use the same packaging for different frame styles? Yes — a consistent packaging system across your product line reinforces brand identity and simplifies procurement. Use a standard case size that fits your largest frame, and rely on hang tags and lens stickers to differentiate individual styles. Avoid creating a separate packaging SKU for each frame style on your first order.
How early should I brief my packaging supplier? Brief your packaging supplier at the same time as your frame manufacturer — not after frame approval. Some premium packaging components (magnetic closure rigid boxes, custom-molded cases) have 25–35 day lead times that run parallel to or longer than frame production. Starting packaging development late is one of the most common causes of launch timeline overruns.
Let's get started!
Get in touch with a custom eyewear specialist now for a free consultation and instant price quote.
WHATSAPP ME GO!
📱 Scan with your phone to start chatting